With noise reduction software it is a case of picking your poison. Well I hope this poison at least offers a pleasant taste!
Iain’s Noise Reduction is a filter for the G’MIC plug-in for GIMP 2.8. It is currently found in the Testing->Iain Fergusson folder. Update: This filter is now in the ‘Repair’ folder.
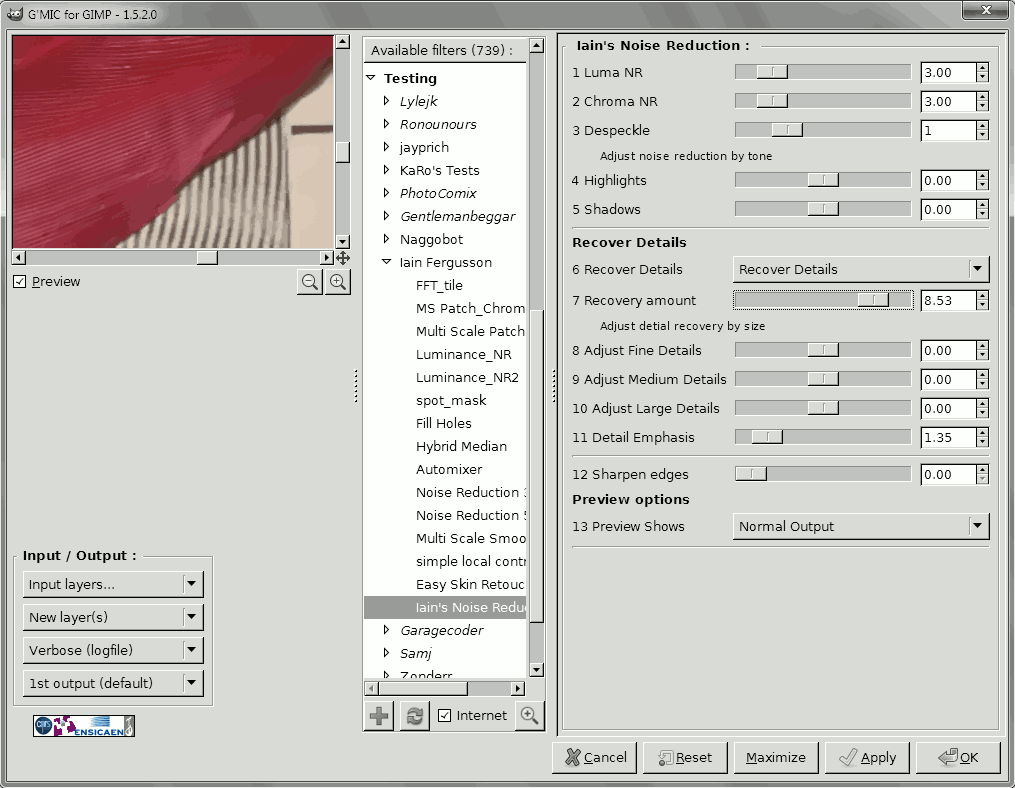
Control descriptions
Luma NR
This adjusts the amount of luma noise reduction. If the control is set to 0 this step is skipped and processing will be faster.
Chroma NR
This adjusts the amount of colour noise reduction. If the control is set to 0 this step is skipped and processing will be faster.
Despeckle
This reduces the amount ‘salt-and-pepper’ noise. It is performed just before the luma noise reduction, so adjustments made here will affect the luma noise reduction.
If the luma noise reduction is set to 0, the despeckle step is also skipped.
When set to level 4, the main luma noise reduction is adjusted to skip removal of fine noise because it should have been taken care of by the despeckle algorithm. This should speed up the denoising.
Adjust noise reduction by tone
This allows you to adjust the amount of noise reduction in the shadows and highlights.
Recover Details
The detail recovery step works with the information removed by the luma noise reduction and recovers details that are stronger than a certain threshold. There are three options recovering details:
- Do not Recover Details
- Recover Details
- Recover Details as separate layer – this will output the recovered details to a separate layer that can be combined with other noise reduction layer using ‘grain merge’ blending mode in GIMP will produce the final image. This option allows the user to apply masks and further processing to the details in GIMP.
Recovering details is the slowest part of this filter, you will have to have patience.
The recovery amount slider sets the overall recovery amount. At low values only the strongest details are recovered. As the slider is raised more subtle details are revealed, but there is a risk that the recovery algorithm will see false details in noisy areas. Setting the slider to 10 will recover all details including noise.

Noisy image before processing.

Details on the red feather are recovered well in the lower right corner, but some false details appear in the shadow area of the feather.
Adjust detail recovery by size
These controls allow the user to adjust the detail recovery based on the size of the details. This is useful to control the appearance of false details
Detail Emphasis
This allows the user to increase the strength of the details so that they are more obvious. This often allows the user to use a lower recovery threshold and reduce false details.
Other considerations
Although the detail recovery is quite good, it can produce artefacts. False details has already been mentioned, another artefacts is detail bleed. Sometimes you will see that recovered pattern actually extend past the boundaries of the original pattern and ‘bleeds’ into other areas. This is because the detail recovery looks for patterns in blocks, and if a pattern is found, with certain settings, the whole block is filled with the pattern, even if the pattern did not fill the entire block originally.
Another artefact is ‘ringing’. If the original luma noise reduction softens strong edges too much the detail recovery algorithm can produce parallel lines running along side the edge.

Noisy image.

Ringing is visible as parallel lines running beside the edges.
Sharpen edges
This sharpens the luma channel, but does not sharpen the details.
Preview Shows
- Normal Output
- Luma Noise – shows an amplified view of what is being remove from the luma channel
- Chroma Noise – shows an amplified view of what is being removed from the chroma channel
- Details – shows an amplified view of what is being recovered in the detail recovery step.
Notes on using the filter
Successful detail recovery is a balance of the luma noise reduction setting (including despeckle) and the detail recovery settings. The detail recovery section works with the information removed in the luma noise reduction section, so adjusting the luma noise reduction will affect the amount of details recovered. Generally the luma noise reduction should be set to slightly over-smooth the image so that the detail recovery section has enough information to detect the details. Small adjustments of the luma noise reduction amount can improve the detail recovery, so a bit of fine tuning is required for the best results.

Which filters of G’MIC did you use to implement it?
Mainly ‘-denoise’ and ‘-fftpolar’/’-ifftpolar’.
Does Denoise is Non Local Means based?
It’s patched-based but I don’t know exactly how it works. I guess it is similar to NL means. You’d have to ask the G’MIC authors.
I see.
I thought you’re one of the programmers team.
Aren’t you?
No. I just contribute filters written in the G’MIC script language. I don’t have anything to do with the commands that are available for scripting.
Where did you get the knowledge of the behind the scene math?
I taught myself, but all the tricky stuff is done for me. I have no idea how FFT works all I know is if I use the command -fftpolar I get a frequency plot that I can manipulate like any other image.
hello, I didn’t see this filter in the new G’MIC (1.5.9.3, Linux 64 bits). Where has it gone?
The menus have been moved around. It is under the ‘repair’ menu now
I am using the “Noise reduction 5” filter for color noise reduction and it is very good. Where can I find the sources for this script ? I would like to do some customization.
Check your systems application data foder for updateXXXX.gmic where XXXX is the version of gmic you are using.
In windows the file is in c:\users\USERNAME\appdata\roaming
I use (plug-in-gmic 1 img draw 5 “-inpaint [0]”) in script fu. Can You send the command for Iain’s noise reduction ?
Something like that : (plug-in-gmic 1 img draw 5 “-iainsnoisereduction [0]”) with default values of options.
Thanks
It will something like this
-iain_iains_nr [0] 3,3,1,0,0,0,1,0,0,0,1.35,0,0
Sorry, I also tried variations – always message: invalid arguments. Can You help ?
It is the best NR I ever used
Try it with no space between -iain_iains_nr and [0] like this
-iain_iains_nr[0] 3,3,1,0,0,0,1,0,0,0,1.35,0,0
If that doesn’t work perhaps try asking your question here: https://discuss.pixls.us/
It works ! Thank You very much